Thursday, July 5, 2012

Smoked Yellow Fin Tuna Burgers


As some of you may know, every Wednesday in our home is Burger Night. We grill up a different burger every week. This week was no exception.

I had some smoked yellow fin tuna left over from a while back and decided to throw down some burgers with it. Here is how I prepped the tuna...

I put a few smoked tuna steaks in the food processor, along with two chopped green onions and black pepper, and ground everything up.

Next I mixed in one egg and one heaping tablespoon of mayonnaise for binders. I would have preferred to use plain low fat yogurt, in lieu of the mayonnaise, but unfortunately I didn't have any on hand.

I then fashioned two paddies and applied olive oil to one side of each burger.

I heated my gas grill, topped with a stainless steel grilling tray, to medium-high heat and grilled both paddies.

I basted the paddies with Kraft's Extra Virgin Olive Oil Italian Vinaigrette Dressing on each side.

And that is how it all went down.

Here are a few pictures of this process...

Tuna Paddies and Oroweat Sandwich Thins bread on the grill.

These paddies are almost ready!!

The condiments have been added.

Finalized with Swiss cheese, tomatoes, green butter lettuce and alfalfa sprouts. We really liked the Oroweat Sandwich Thins for a change of pace and a somewhat health conscious tuna burger.

Of course the theme of this weeks burger was health conscious to a certain extent. After all there are just some condiments that I will not forego. And to top it off this was all served with our veggie fries which were grilled and cut yardlong beans basted with the Kraft's dressing. If you have never tried grilled long beans, you got to give yourself a treat. I prefer this over my other grilling staple of Asparagus.

Well, we had some darn good eats and we are looking forward to next Wednesday when I am going to grill us up some Firehouse Burgers with specially battered onion rings.

Until next time....

Tuesday, July 3, 2012

Pecan Tassies (Tarts)...the perfect snack.


Sometimes your sweet tooth kicks in and sometimes you just got to have some type of pasty. Well, I have the perfect solution for both. Pecan Tassies as they are known on Guam. Also known as Pecan Tarts.

These little jems have that fabulous pecan, butter, vanilla, and brown sugar filling in a fantastic, flaky pastry cup. Talk about tasty and the worst thing is that they are bite sized. A dozen is just not enough.....believe me!!

Well, here is the recipe and instructions....

Pecan Tassies (Tarts)

Recipe version by Lupe (Dydasco) Olivas 

Ingredients: 

For the dough: 

½ cup butter 
1 3-oz. pkg cream cheese 
1 cup all-purpose flour 

For the pecan filling: 

1 egg 
¾ cup brown sugar 
1 tsp vanilla 
Dash of salt 
1 tbsp butter 
½ cup coarsely chopped pecans 

Directions: 

For pastry, in mixer bowl, mix together the ½ cup butter and the cream cheese. 

Add flour and mix well. Set aside. 

Mix into bowl the egg, brown sugar, the 1 tablespoon butter, the vanilla and salt, until smooth and set aside. 

Roll pastry dough into 1 inch round balls and place into an ungreased mini-muffin tray. 

Shape dough in each muffin cup to cover the bottom and sides. 

Spoon about 1 tsp of chopped pecans into each muffin cup. 

Fill each cup up with the egg/brown sugar mixture that you previously set aside. 

Pre-heat the oven to 325 F, and then bake for about 25 minutes or until filling has set somewhat firm. Individual ovens vary with their own specific temp and timing. You know how that goes. 

Remove and allow to cool. 

This should make about 24 tarts. 

You can adjust this recipe to your individual taste. 

Pecan Tassies

This was all that was left of 4 dozen. You know I had to flex my quality control wings...

Do yourself a favor and try these out. And don't forget that ice cold glass of milk.

Until next time.... 

Wednesday, June 27, 2012

Let's Make Some Lumpia!!!!


Lumpia, also known as spring rolls, are an Asian treat that is popular all over the world. These are basically "mini-burritos", Asian style. They can be filled with whatever you want to put in them. And the dipping sauces are as diverse as the lumpia themselves. But one thing is for certain, these little guys are so tasty that once you start in on them you'll find it hard to stop.

Here is a step by step photo tutorial featuring my wife, Lupe....

Chop up you meat into small pieces and stir fry in butter with fresh, minced garlic. Lupe used shrimp and chicken.

Once your meats are cooked add the veggies that you prepared and stir fry them with the meat/seafood. Lupe used carrots, bean sprouts, fresh green beans, and cabbage. These were all thinly sliced. Salt and pepper to taste. You can experiment with the flavor. You might want to try oyster sauce, apple cider vinegar, etc. Come up with your own unique flavor.

Here is the mix all ready to be rolled into the lumpia wrappers.

Here you can see Lupe adding the meat/veggie mixture onto the lumpia wrapper. You can also take note of the type of wrapper Lupe uses.

As Lupe rolls, she also applies a little of the water/cornstarch mixture as a type of glue to keep the wrapper together. This mix is 1/2 cup of water to 1 tbsp of cornstarch. You can always add more cornstarch if you like.

Lupe folds the side in like a burrito and applies the cornstarch to the sides as she goes.

Here is the finished wrapped lumpia. Lupe is applying the cornstarch to the closing flap.

Once you have everything wrapped you can begin your frying. Fry over medium/high heat, turning each lumpia to get a uniform golden brown. Just like fried chicken.

Here is one ready to come out. Lupe allows the excess oil to drain before placing the lumpia in the colander.

Here are the lumpia draining and cooling while Lupe continues to fry the rest.

The finished product with Lupe's sweet and sour sauce. What sauce you use for dipping is up to you. The Vietnamese use a fish sauce base for their dipping sauce and it is excellent.

Of course there are many ways to plate and serve lumpia. On Guam the popular way is the lumpia wrapped in a leaf of Romaine lettuce, with rice noodles, bean sprouts and Vietnamese mint or Thai Basil. This is utterly delicious.

Try making your own. Fresh is best and you will find that it is not as hard as you may think. Once the prep is done, the rest is easy. Word of caution though, make a bunch because once you start eating these delicious, home-made appetizers, you can't seem to stop.

Until next time....

Friday, June 22, 2012

Salmon Salad


Salmon Salad is one of my wife Lupe's favorite salads. And rightfully so. The combination of salmon and fresh vegetables with lemon juice and hot pepper, really drives your taste buds crazy. This is quite an amazing dish. This is the step by step process that she uses to make her tasty dish.

Here is how Lupe does it....

She uses one can of red salmon. She likes to use the Bumble Bee Brand Wild Alaska Red Salmon. 14.75 oz. can. She breaks up the salmon ever so slightly. She likes to maintain big pieces. Later when she mixes everything up, these pieces will break up a little. 

She then cuts the young Japanese eggplant in half, lengthwise. 

Then cuts each piece slightly diagonal and thin about 1/8 inch wide. 

Mixes the eggplant in with the salmon. 

Now chop up the green onions. Amount is up to you.

Add that in the mix. 

Lupe prefers using cherry tomatoes that are a little firm. She doesn't like a soggy salad. Juicy tomatoes will make your salad soggy. 

She slices the tomatoes into smaller pieces. 

Then she adds the tomatoes into the mix. 

Next she cuts up the fresh fioles (frijoles) into small, 1/4 inch chunks. She parboils the fioles for 3 minutes after the water comes to a boil. A raw fiole has a slight bitter flavor and the parboiling neutralizes that. She then adds the parboiled fioles in. The fioles are Long Asparagus beans.

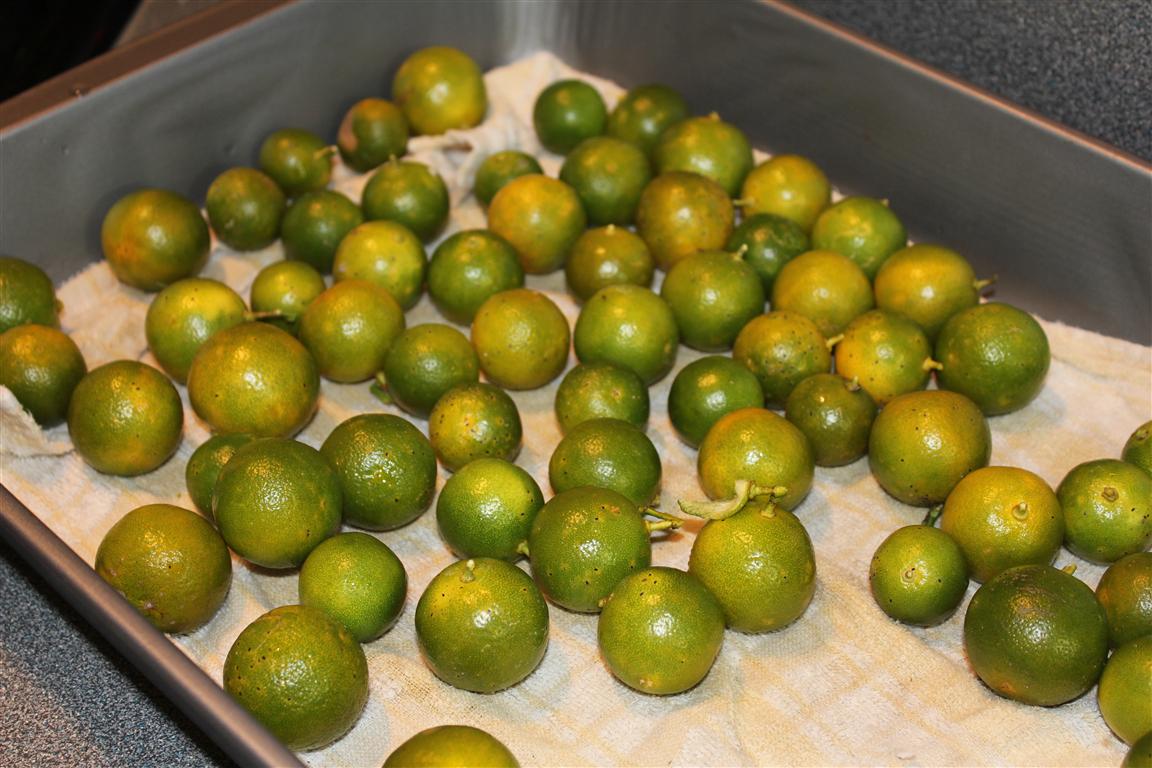
These are the Calamansi lemons that we use. Great flavor!!

Once all the veggies are in, she now adds in about 6 cloves of thinly sliced garlic. Then adds the calamansi juice, diced hot pepper and salt. All these to your individual taste.

She "tosses" this like you would any salad. She is careful not to break up the salmon chunks too small. Let this sit for a while so the flavors can blend. That is if you can resist the temptation of eating it all. 

Heat some corn tortillas up and eat away!! Here is the salmon salad on top of a heated corn tortilla. 

Salmon Salad Taco

That's all there is to it. Quite an easy dish to prepare once you get the hang of it. And this definitely has a lot of flavors going on. Your taste buds are definitely going to thank you.

Until next time....

Friday, June 15, 2012

Taco Party Menu: bonappetit.com


Just about everyone likes Tacos. I mean it's the perfect dish. Got leftovers, whip up a few tacos. Just that easy. Of course you can get a little more imaginative and come up with a whole feast featuring tacos. And guest what? That is just what I read about in the recent June 2012 issue of Bon Appetit magazine. 

If you like tacos, I highly recommend you check out the article. Here is the link.....


Enjoy the article. I did!!

Until the next time....

Friday, June 8, 2012

Chile Verde Burrito

Chile Verde Burrito

I wanted to eat something different but I just couldn't put my finger on it until I spoke to my sister Cynthia Vogelsanger of San Jose, California. She told me that she was serving up Chile Verde Burritos for dinner. The big "light" went on in my head and I said to myself, "That's what I want!!" I asked her for her recipe and I set out to cook me some Chile Verde.

Here is Cynthia's recipe...

Chile Verde Burritos 
by Cynthia Vogelsanger 
  • Chop up cooked pork meat and 1 whole white onion 
  • Heat a 2 Tbs. of butter in a skillet 
  • Sauté onions 
  • Add pork or any other meat you may have. 
  • Add your favorite salsa
  • Add 1 small can chopped green chilies ( She likes Ortega) 
  • Salt to taste 
  • Lower heat and simmer for 20 mins. 
Assembly: 
  • Heat a flour tortilla 
  • Put chile verde mixture on the tortilla 
  • Sprinkle some shredded cheese (Mexican 4-cheese) 
  • Sour cream 
  • Roll tortilla 
  • Serve with retried beans, rice, or whatever sounds good. 
You can pretty much add your own Mexican spices like cumin, dried oregano, fresh tomatoes, etc. or whatever you think would spice it up. I like easy, and I pretty much make this recipe by throwing everything together and taste.

That's her recipe and a very tasty one at that.

Now I did use fresh Anaheim green peppers and I did add a little water while the chile verde was simmering. Avocado slices or guacamole would go great with this burrito also.

And of course I just happen to have a jar of my Mother's fantastic salsa that I made. Here is her recipe....

Mom's Salsa Recipe
by Connie Centeno Quigley of Santa Maria, California
  • 14 serrano chilies 
  • 10 jalapeno chilies 
  • 10 yellow chilies 
  • 4 cloves minced garlic 
  • 1 medium red onion, cubed 
  • ½ tsp ground cumin 
  • ¼ tsp ground cloves 
  • 1 cup loose, chopped fresh cilantro or more to your taste 
  • 3 cubed fresh tomatoes 
  • 1 15 oz. can of tomato puree 
  • Salt to taste 
Directions:
  • Cook all chilies on a comal (flat pan) until they are soft; 
  • Take all the seeds and stems off; 
  • Put everything in a blender and liquefy. 
  • Taste test and adjust the salt and/or cilantro if desired. This will make about 2 quarts.
And here are a few photos of the process...

Here, the chile verde is simmering as I reduce the liquids.

I am heating up a flour tortilla in a pan.

Next step is to place the filling onto the tortilla and fold it.

And finally I cover the burrito with salsa and more chile verde. But you can put whatever topping you like.

This is a very simple way to use up any leftover meat you may have on hand.

Enjoy and don't forget to put plenty of hot stuff on the burrito. You know you enjoy the sufffering!! But it's a "good" suffering.

Until next time....

Wednesday, June 6, 2012

Mango Jam.....Homemade!!!


Guam has mango trees galore!! And when it's mango season, like right now, we have so many mangeos they are literally falling on the ground. We can only eat and give away so many. But when we do harvest we find no shortage of recipes using our mangoes.

Fresh mango jam is one such island favorite and here is how I make it...

Here is our mango tree. This one tree provides us with more than enough mangoes for our needs.

These are the flowers that will eventually turn into mangoes.

And here are some of the mangoes hanging on the lower branches.

This is just one mornings pickings. All these came from the ground. Gotta be early or the chickens and wild pigs beat you to them.

Lupe slices the meat off of each mango and preserves it. There are layers of mangoes in this freezer.

Here is the basic recipe and directions...

Ingredients: 
  • 40 ounces of fresh mango chucks, pureed
  • ½ cup of mango juice
  • 6 hot peppers (optional)
  • 1 pkg. of Sure Jell Premium Fruit Pectin
  • 1 envelope of Knox Original Gelatine
  • About 1 cup of sugar (to taste)
Directions: 
  1. I pureed the cut mango pieces in the blender (Ninja Blender does a fantastic job);
  2. Then I cook the mangoes in a non stick pan over medium heat, stirring constantly;
  3. I add in the pectin and continue to stir until it dissolves well;
  4. I bullet blended the ½ cup of mango juice and gelatin with the hot peppers and stir this to the mixture;
  5. I then add in the sugar incrementally, to taste. I ended up adding about 1 cup of sugar. I didn’t want the jam too sweet;
  6. I cook this for about 10 more minutes while it boils (still at medium heat) stirring constantly. You will see it start to thicken up;
  7. Then I turn it off and pour into canning jars and refrigerate. As it cools, it really starts to thicken up.

Mango puree cooking.

All jarred and ready for chilling.

That's all there is to it. And once the jam sets up in the refrigerator, it is the perfect consistency.

Make this and try it out yourself. I think you will love fresh, homemade mango jam.

Until next time....